


Wine Fountain Project
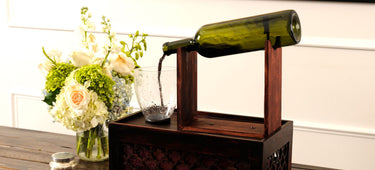
Wine fountains are an elegant decoration that will blow your guests away! This DIY project will create an indoor fountain that is sure to stir up great conversation.
Items Needed
- smartpond® 80 GPH Fountain Pump with Low Water Shut Off Feature
- Wine Bottle
- Wood Box (Size we used: 14 in. x 8 in. x 8 in.)
- Light Cover (Used for wine glass)
- Wood Stain (We used: Bombay Mahogany)
- Vinyl Paper (Color of choice)
- 3/8 in. Tubing
- 1/2 in. Glass Drill Bit
- 3/8 in. Tubing Adapter
- Rubber Grommet
- Piece of Wood (Size we used: 4 ft. x 3 1/2 in. x 1/2 in.)
- Plastic Basin (Size we used: 13 in. x 7 in. x 5 in.)

1. Gather
Gather your supplies.
Find a location you would like to display your wine fountain. You will want a spot near an outlet and have a table to display it on.

2. Prepare
We will begin the project by creating a stand for our wine bottle. This can change based on the size of your wood base size and wine glass height.
For our project, the wood base is 14-in. x 8-in. x 8-in. (L x W x D), and our glass height is 6-in. Here is a downloadable guide to follow the frame measurements we used.

3. Stain
We wanted to use a wood stain for this project. If this is something you would like to do with your project, please do this in a well-ventilated area and follow label directions. We applied two coats of wood stain to the wood base and the frame before moving to the next step.

4. Join
Join the frame together and attach to the turned over wood base with wood glue or screws.

5. Measure
Create a hole in the wood base in front of the frame for your “wine glass” to drop into. For our “wine glass”, we used a hanging light cover that had a base diameter of 2-in., so our hole is just larger than 2-in.

6. Drill & Seal
Use a glass drill bit to create a 1/2-in hole in the wine bottle near where the bottle will align with the back frame. Insert 3/8-in tubing into the the hole and seal with a aquarium grade sealant. Be sure to follow label directions.

7. Drill again
Drill a hole in near the back of the frame for your tubing to be thread through to the inside of the base.
Create a hole along the bottom edge of the wood base for your power cord to run through.

8. Tubing
Attach the tubing to your fountain pump with a 3/8-in tubing adapter.

9. Pump
Your pump will be set in the water basin that will be hidden under your wood basin. With our wood base being 14-in x 8-in x 8-in (L x W x D), our water basin needs to be 13-in x 7-in x 7-in (L x W x D) or smaller. Thread your power cord over the basin and through the hole you created in step 9.

10. Grommet
Add a rubber grommet around the base of the “wine glass” light cover and place in the hole created in step 6.

11. Funnel
Add a trimmed funnel to the base of your glass and seal with aquarium grade sealant for additional direction of your water outflow.

12. Water
Add water in the the basin of the fountain.

13. Start
Start your fountain by plugging in the power cord to the nearest outlet.

14. Coloring
Add food coloring as desired. To get the look of a red wine start out by adding red food coloring and add a hint of blue to deepen it.
15. Enjoy
Enjoy your new fountain. You can get even more creative and add colorful plastics or metals behind the gaps in wood to conceal your water basin.
watch & learn
How to build a wine fountain.