


Update an Existing Pond Project
MOVING INTO A HOME THAT HAS A POND CAN OPEN UP YOUR IMAGINATION TO THE POSSIBILITIES OF ALL A WATER FEATURE CAN BE. HERE IS YOUR UPDATE GUIDE!
Items Needed
- 1,320 GPH Pond and Waterfall Pump
- 8 in. Spillway
- 1 in. Tubing
- 10 ft. x 15 ft. Pond Liner
- Landscaping Rocks
- Filter Kit with Pump
- Floating Lily Pad Variety Pack
- Pond Tint
- Mini LED Pond and Landscape Lights (or Pond and Landscape Lights)
1. Inspect
The first step is determining what aspects you like and what elements need improving. For this pond, we wanted it to be larger and have more water movement, but we wanted to keep the waterfall.

2. Disassemble
Remove the water, rocks, and liner and start digging to the size and depth desired. We found the previous owners sealed under the pond with cement, which created an interesting challenge, but once that was broken away from our pond placement, we were ready to get started.

3. Trim & remove
Be sure to trim any roots and remove any stones that may puncture the liner.

4. Location
Select a location for your waterfall. You will want a spot that is visible from a variety of locations. Level the placement, and place your spillway as a guide.

5. Underlayment
Use an underlayment as a protective barrier for your liner. This should help to prevent any puncturing once the pressure of water is added to your liner. You can use cardboard, carpet, or a tarp as an underlayment material.

6. Liner
Add your liner. It is important to leave extra folds in the liner to adjust as water is added. Make sure you have at least an extra foot of liner around the entire perimeter of the pond.

7. Trim
Trim any excess liner.
Tip: Leave at least 1 ft. of overhang around the edges of the pond to ensure the liner does not slip due to the weight of the water. It can be disguised with decorative rock or landscaping.

8. Rocks
Place landscaping rocks around the edge of your liner to hold it in place.

9. Adapters
Begin connecting your equipment together by trimming any tubing adapters to fit the tubing size you selected.

10. Tubing
Attach your tubing from the pump to the waterfall spillway.

11. Level
Ensure your spillway is level for an even water flow.

12. Fill
Fill in your landscaping rocks all around to create a beautiful feature. Make sure to save one larger flat rock to cover your spillway to give it a more natural look.

13. Landscape
Pick out plants to accent the shape, color of your stones, and add lights around your pond.

14. Water
Add water.

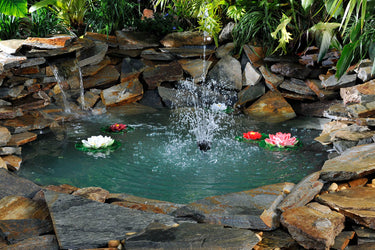
15. Add-ons
Then we added floating lilies and a touch of pond tint for a beautiful color. We also added the Filter Kit with pump for additional filtration, aeration and decoration with the included nozzle. Pond and Landscape lights are a great addition for nighttime enjoyment, too!
watch & learn
How to build a pond.